Requirements
Before starting this rooting process, ensure you have:
- Unlocked bootloader
- PC with ADB installed
- USB Debugging enabled on your device
- Device's USB drivers installed on PC
- USB cable with data transfer support
- GitHub Account
- Device with fastboot and GKI kernel support
Background
Currently the best root solution is SukiSU-Ultra. SukiSU-Ultra (which I'll refer to as Suki) is a fork of KernelSU. You may have used or are using Magisk, which is similar to KernelSU in some ways but very different in others. If you want to read up on this, a full explanation can be found here.
As far as what the average user is concerned, KernelSU and providers based on it are much better at hiding root than Magisk. In this guide I will show you how to get Suki with SuSFS (Hides root traces) for GKI kernels on devices that have fastboot. If you do not fall under this bracket you will need to find a different guide for rooting, but root hiding will still work.
Rooting Process
Step 1: Building the Kernel
Finding Your Kernel Version
To begin building kernel with Suki and SuSFS you will need to find your kernel version. This is normally found in Settings under Android Version in Device Info.
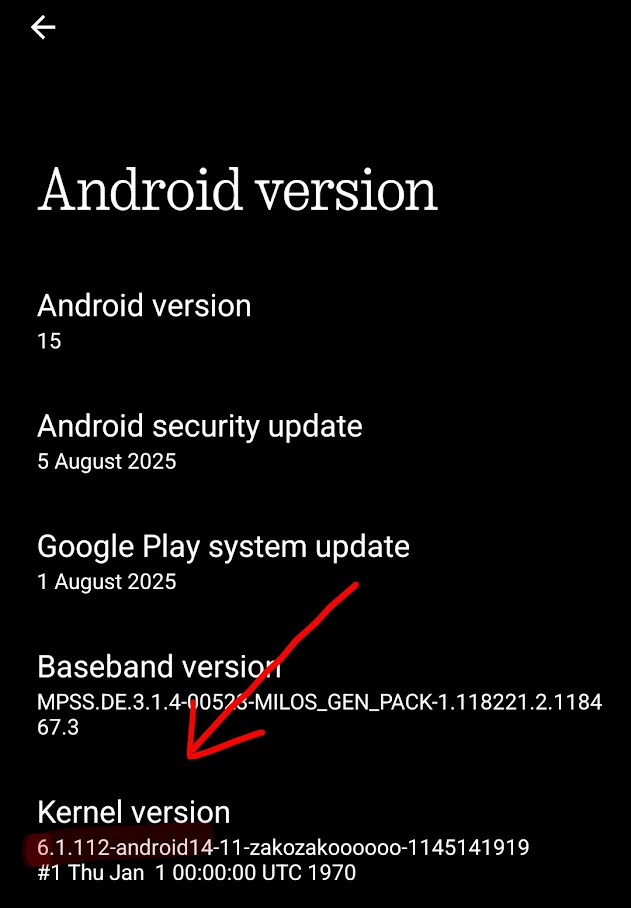
You will need something that looks like android14-6.1.112 (Don't worry if it doesn't match your Android version - it may also be the other way around.)
Building the Kernel
Now we need to fork this repository. Once you fork it you will want to clone the repository or edit it through the website. To start you need to go to the .github folder then workflows then the kernel-aX-X.XX.yml file that matches your kernel version. For example, as I'm on android14-6.1.112 I need to edit the kernel-a14.6.1.yml file.
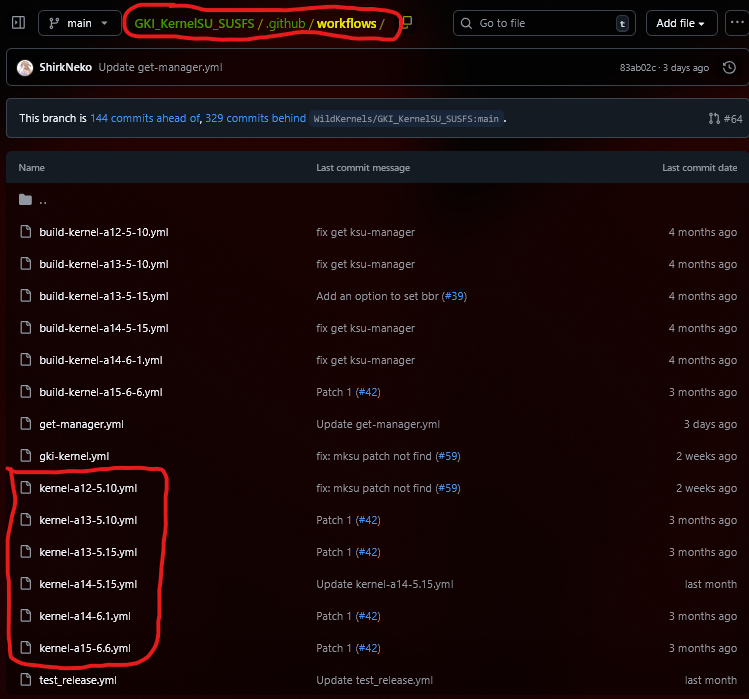
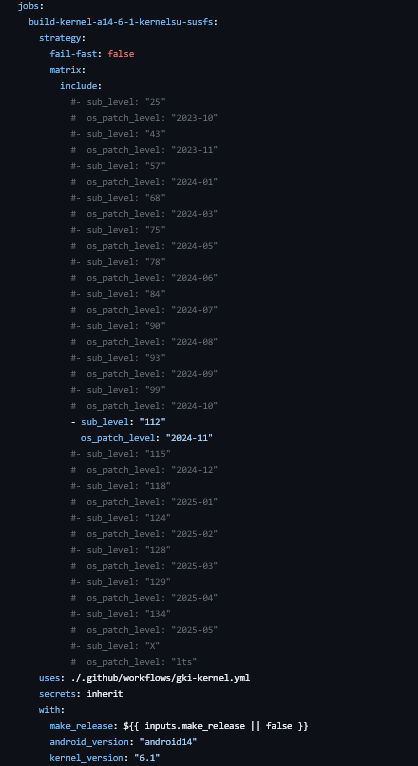
Next open your file and scroll down until you see a list of sub_levels and os_patch_levels (some of these will be commented out). You now want to find your sub_level - for me as I'm on android14-6.1.112 it would be 112.
You will now need to:
- Uncomment your
sub_leveland the correspondingos_patch_level(the line below your sub_level) if they are commented out (there is a#in front of the line) - Comment out all other
sub_levelsandos_patch_levelsso that only your required version is built
When you have all this done your workflow file should look something like this with only one sub_level and os_patch_level uncommented:
Once you have that edited you can simply commit it and move to the actions tab of your fork of the repository. In actions look along the sidebar for one workflow with the name 编译内核aXX-X-XX you will need to find the one corresponding to your kernel version. For me it would be 编译内核a14-6-1 as I'm on android14-6.1.112.
Once you have found the correct workflow:
- Press the "Run workflow" button
- This will open a dropdown - you don't need to change anything here
- Just press "Run workflow"
Now let that run while we root our phones.
Step 2: Patching init_boot/boot.img
Now we need to root our device. To do this we will first need to find our build number, this can be found in Settings under Software Info in Device Info. For me it's Asteroids_V3.2-250717-1803.
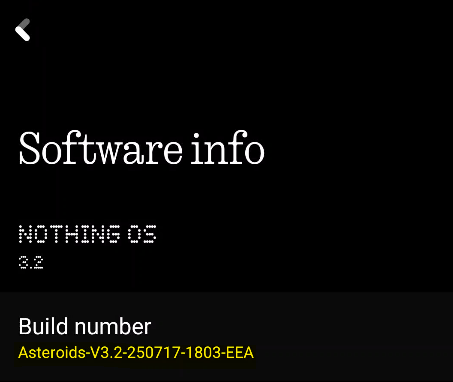
With this we will need to find our boot images. To find this we can normally just google your build number and it should come up. For me it's a repository called nothing_archive but this will most likely be different for you.
Once you get a copy of your boot images we will then need to get SukiSU-Ultra Manager you can find this in their telegram or github.
Once you have installed the manager:
- Click on the top bar that says "Not Installed, Click to install"
- Press "LKM repair/installation"
- The first/only option should be "Select a image that needs to be patched"
- Click this and select your
boot.imgfor your build version - After you select your
boot.imgit should show a script running - Once it's finished it should say the path of where it's exported the patched image on the device
- Copy this to your PC
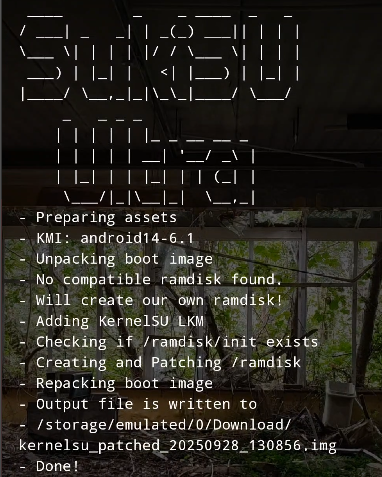
Next, plug in your phone to your PC and allow USB debugging from your PC if you haven't already. Then we will need to run these commands:
1) Reboot to fastboot
adb reboot fastboot
2) Flash boot.img
fastboot flash boot "path/to/patched/boot/image"
3) Reboot device
fastboot reboot
Once the phone has finished booting check manager to see if it was successful. Where it previously said 'Not installed' should now say 'Working'. If not, it's most likely that your device needs to patch init_boot not boot. Look at the guide below for that.
Note: Patching init_boot
Once you have installed the manager you will want to click on the top bar that says "Not Installed, Click to install". Once you click it you will want to press LKM repair/installation then the first/only option should be "Select a image that needs to be patched", click this and select your
init_boot.imgfor your build version. After you select yourinit_boot.imgit should show a script running once it's finished it should say the path of where it's exported the patched image on the device to. You will want to copy this to your PC.Next plug in your phone to your PC and allow USB debugging from your PC if you haven't already. Then we will need to run these commands:
1) Reboot to fastboot
adb reboot fastboot2) Flash init_boot.img
fastboot flash init_boot "path/to/patched/init_boot/image"3) Reboot device
fastboot reboot
Step 3: Flashing the Kernel
Next we will need to download the artifacts from our action/workflow (This will be at the bottom of the summary page of your workflow run). One artifact should be called SukiSU_kernel-androidX-X-XX-X - download and extract this on your device with the manager. Once extracted, you should be able to see a zip inside called androidXX-X.X.XX-XXXX-XX-AnyKernel3.zip - remember where this file is located.
In the manager:
- Click on the bar we clicked before to patch either
init_boot.imgorboot.img - Once clicked there should be a "Flashing AnyKernel3" option
- Select this and the option that appears on clicking it
- You should now select the zip you extracted from the artifact of your workflow run
- This should then start to install the AnyKernel3 zip
- Reboot when prompted
Your device should then reboot. Open the manager again - the top bar should now say "Working" and "built in" after it. Congratulations, you have successfully rooted your device!

Conclusion
You now have a rooted Android device with SukiSU-Ultra and SuSFS for enhanced root hiding capabilities. This setup provides better root concealment compared to traditional Magisk installations, making it ideal for users who need root access while maintaining compatibility with banking apps and other security-conscious applications.
Important Notes:
- Always backup your device before attempting to root
- This process may void your warranty
- Ensure you understand the risks involved with rooting
- Keep your kernel and root solution updated for security
